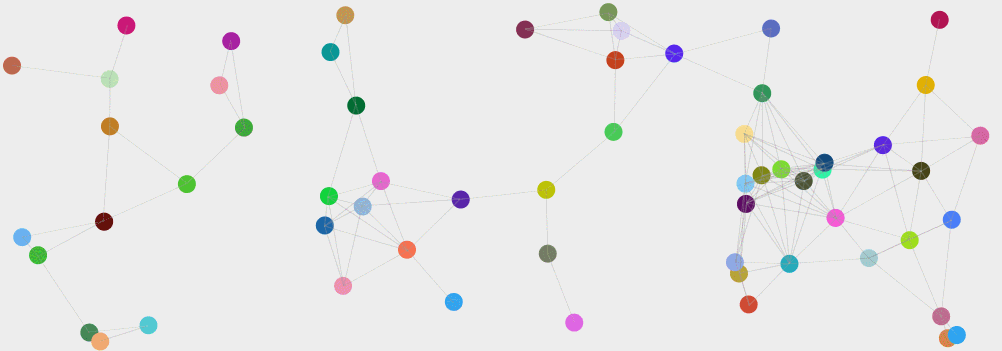
知乎的网页版登录界面的背景有很多运动的小球,小球和小球运动的时候之间还有连线,给人一种三维立体变换的效果,看着十分的不错,所以就试着做了个和知乎登录界面背景类似的效果,下面是我做好的效果的截图。
实现思路
首先了解下canvas中的动画原理?canvas中的动画其实是通过不断的重绘来实现动起来的效果的,打个比方一个小球初始的时候在画布的X,Y坐标记作ball(x,y),然后每隔10毫秒更改小球的X,Y坐标为ball(x+5,y+5)(在当前X,Y坐标加5个像素) 并且清除整个画布,重新在画布上绘制更改坐标后小球,由于10毫秒非常的短,所有在视觉上给我们的感觉就是小球在不断运动着。canvas绘图的原理基本就是这样子。
定义小球对象
 1
 2
 3
 4
 5
 6
 7
 8
 9
10
var ball = { xPointer: 100, //小球初始x坐标 yPointer: 100, //小球初始y坐标 vx: 1, //x方向的速度 vy: 0.1, //y方向的速度 x: 1, //x轴运动方向(1表示正方向,-1表示反方向) y: -1, //y轴运动方向 color: "blue", //小球颜色 radius: 10, //小球半径 };生成小球 demo中的小球有很多个,所以定义一个数组来装这些小球,小球的起始坐标、颜色、运动方向都不同所以这些值需要随机获取。
 1
 2
 3
 4
 5
 6
 7
 8
 9
10
11
12
13
14
15
16
17
18
19
20
21
22
23
24
25
26
27
28
29
30
31
32
33
34
35
36
37
var ballList = []; //小球数组 var canvas,ctx; //生成多个小球 function initBall() { canvas=document.getElementById("canvas"); ctx=canvas.getContext("2d"); //循环生成60个小球 for (var i = 0; i < 60; i++) { // console.log(getIndex() + " " + getIndex()) var ball = {}; ball.xPointer = getRandom(20, 980);//随机小球的X坐标 ball.yPointer = getRandom(20, 340);//随机小球的y坐标 ball.x = getIndex();//随机小球x轴运动方向 ball.y = getIndex();//随机小球的y轴运动方向 ball.vx = Math.random();//随机小球x轴方向速度 ball.vy = Math.random();//随机小球y轴方向速度 ball.radius = 9;//小球半径 ball.color = "#" + ("00000" + ((Math.random() * 16777215 + 0.5) >> 0).toString(16)).slice(-6);//随机小球颜色 ballList.push(ball); } } //随机一个1或者-1的方法 function getIndex() { var arr = [0, 1]; var index = Math.floor((Math.random() * arr.length)); if (index == 0) { index = -1; } return index; } //获取两数之间的一个随机数的方法 function getRandom(first, last) { var choice = last - first + 1; return Math.floor(Math.random() * choice + first); }通过canvas绘制小球 页面canvas标签
1<canvas id="canvas" width="1000" height="360" style='background-color: #EEEEEE;'></canvas>
canvas绘制小球代码
|
|
运动起来 小球运动的过程中使用了简单的碰撞检测,每次到达画布的边缘就改变小球的运动方向
1 2 3 4 5 6 7 8 9 10 11 12 13 14 15//修改小球的状态,使小球动起来的方法 function update(ballList, ctx) { for (var i = 0; i < ballList.length; i++) { ballList[i].xPointer += ballList[i].vx * ballList[i].x; ballList[i].yPointer += ballList[i].vy * ballList[i].y; //碰撞检测 X轴方向 if (ballList[i].xPointer + ballList[i].radius >= canvas.width || ballList[i].xPointer - ballList[i].radius <= 0) { ballList[i].x = ballList[i].x * -1; } //碰撞检测 Y轴方向 if (ballList[i].yPointer + ballList[i].radius >= canvas.height || ballList[i].yPointer - ballList[i].radius <= 0) { ballList[i].y = ballList[i].y * -1; } } }绘制小球和小球之间的连线
1 2 3 4 5 6 7 8 9 10 11 12 13 14 15 16 17 18 19 20 21 22 23 24//小球之间连线 function drawLine(ballList, ctx) { for (var i = 0; i < ballList.length; i++) { for (var j = 0; j < ballList.length; j++) { var xx = Math.pow((ballList[i].xPointer - ballList[j].xPointer), 2); var yy = Math.pow((ballList[i].yPointer - ballList[j].yPointer), 2); var zz = Math.sqrt(xx + yy); //判断两个小球如果之间距离在20到100之间,就绘制一条直线 if (zz <= 100&&zz>=20) { console.log(zz) ctx.save(); ctx.beginPath(); ctx.strokeStyle="#999999"; ctx.lineWidth=0.1; // ctx.strokeStyle= "#" + ("00000" + ((Math.random() * 16777215 + 0.5) >> 0).toString(16)).slice(-6); ctx.moveTo(ballList[i].xPointer, ballList[i].yPointer); ctx.lineTo(ballList[j].xPointer,ballList[j].yPointer); ctx.closePath(); ctx.stroke(); ctx.restore(); } } } }运行
 1
 2
 3
 4
 5
 6
 7
 8
 9
10
11
12
13
14
(function(){ initBall();//生成小球 //计时器 setInterval(function() { // console.log(selectfrom(0, 600) + " " + selectfrom(0, 600)); draw(ctx);//绘制 update(ballList, ctx);//修改小球状态 drawLine(ballList, ctx);//画线 }, 24) })();
其它
由于代码比较简单和少,也就没有做封装处理
通过修改小球的半径后得到了另一种不错的显示效果,如下图

到此一个canvas小球运动效果的demo做完了,看着是不是有一种3d变换效果。
参考文档
canvas参考文档 canvas api
